1. ansible特点
不需要安装客户端,通过sshd去通信
基于模块工作,模块可以由任何语言开发
不仅支持命令行使用模块,也支持编写yaml格式的playbook
支持sudo
有提供UI(浏览器图形化)www.ansible.com/tower 10台主机以内免费
开源UI https://github.com/alaxli/ansible_ui
文档 http://download.csdn.net/detail/liyang23456/7741185
2.ansible 安装
两台机器 192.168.0.82 192.168.0.81
只需要在192.168.0.82上安装ansible即可
|
|
ansible 配置密钥
192.168.0.82上生成密钥对
ssh-keygen -t rsa 直接回车即可,不用设置密钥密码
|
|
把公钥(id_rsa.pub)内容放到对方机器(111)的/root/.ssh/authorized_keys里面
|
|

本机也要操作
|
|
|
|
关闭selinux

检测连接
|
|
|
|

ansible 更改配置文件
|
|
增加
|
|
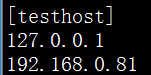
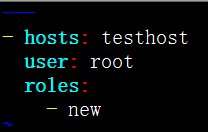
说明: testhost为主机组名字,自定义的。 下面两个ip为组内的机器ip。
3.Ansible 远程执行命令
|
|
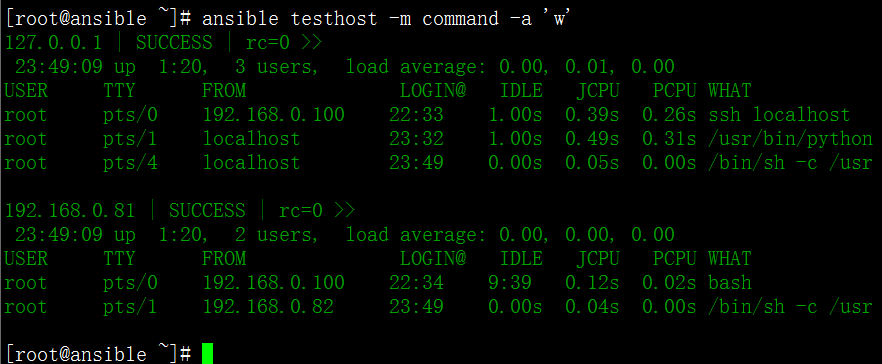
这样就可以批量执行命令了。这里的testhost 为主机组名,-m后边是模块名字,-a后面是命令。当然我们也可以直接写一个ip,针对某一台机器来执行命令。
|
|

错误: “msg”: “Aborting, target uses selinux but python bindings (libselinux-python) aren’t installed!”
解决:
|
|
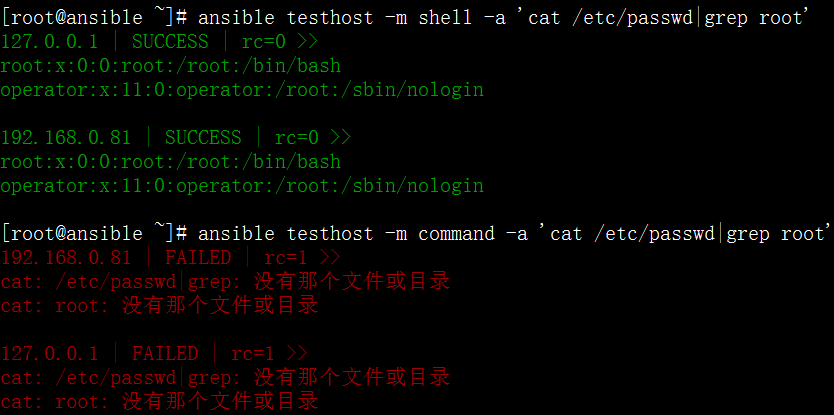
还有一个模块就是shell同样也可以实现
|
|
shell 和 command 的区别
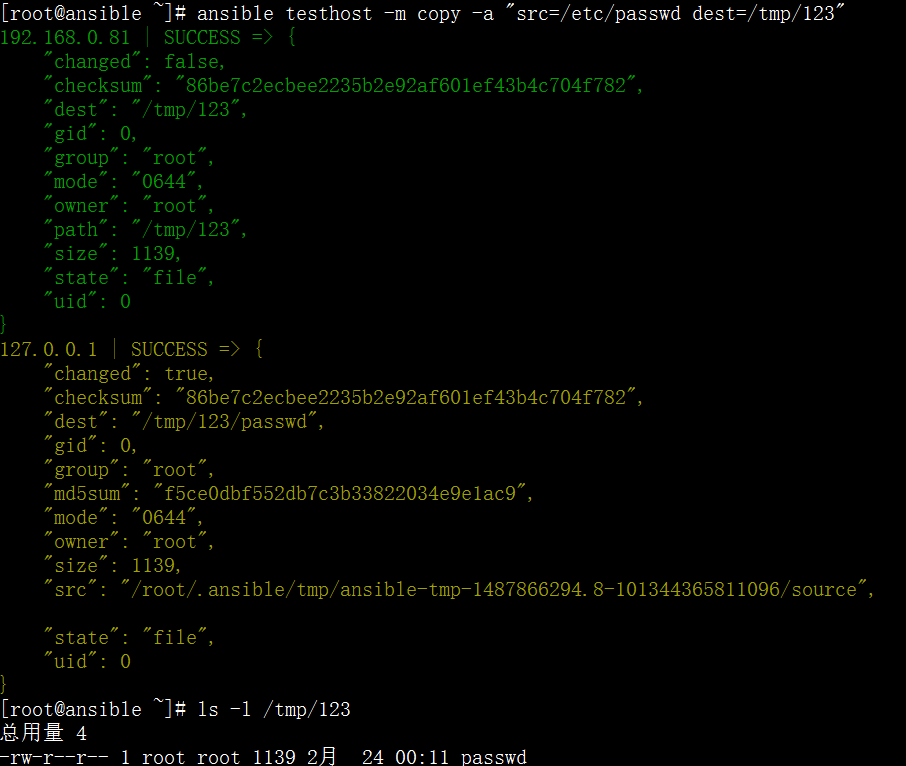
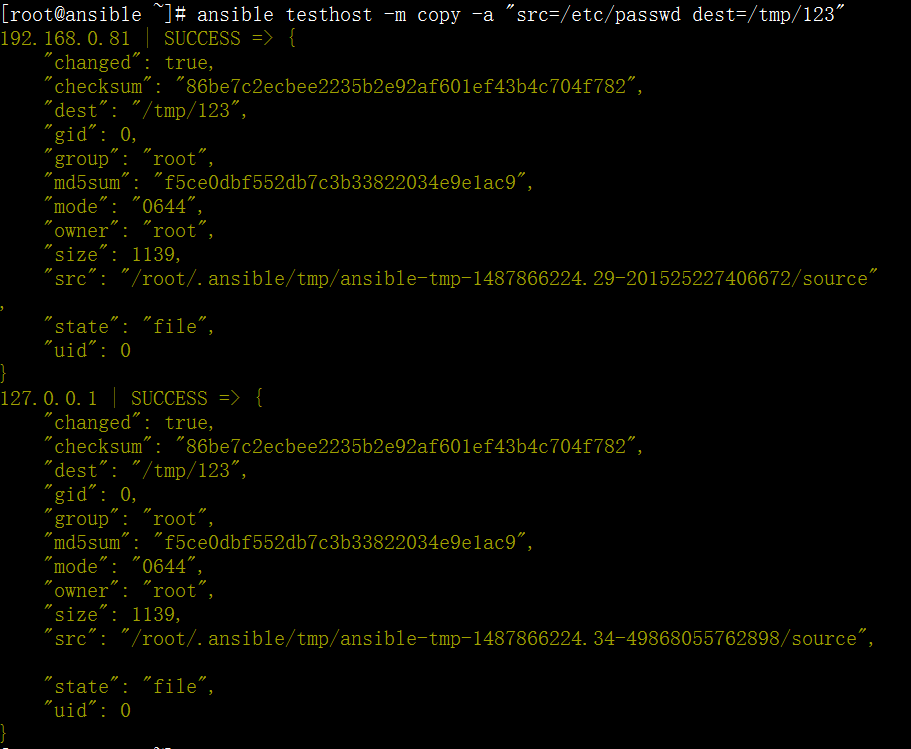
4.ansible 拷贝文件或者目录
|
|
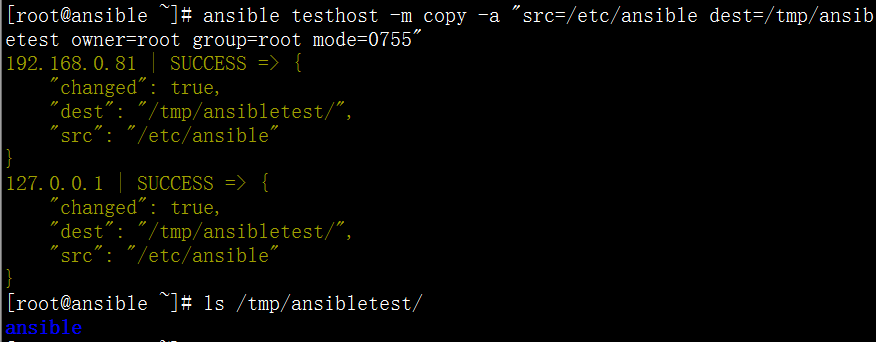
注意:源目录会放到目标目录下面去,如果目标指定的目录不存在,它会自动创建。如果拷贝的是文件,dest指定的名字和源如果不同,并且它不是已经存在的目录,相当于拷贝过去后又重命名。但相反,如果desc是目标机器上已经存在的目录,则会直接把文件拷贝到该目录下面。
|
|
这里的/tmp/123和源机器上的/etc/passwd是一致的,但如果目标机器上已经有/tmp/123目录,则会再/tmp/123目录下面建立passwd文件.如果没有123目录,则直接创建123文件。
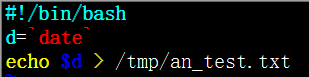
5.ansible 远程执行脚本
首先创建一个shell脚本
|
|
加入内容
|
|
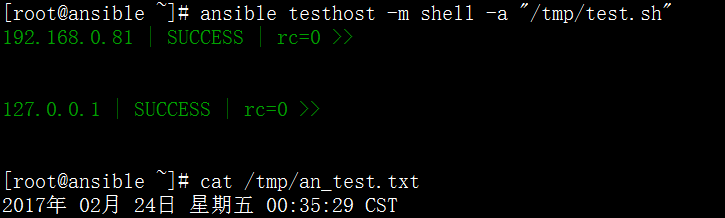
然后把该脚本分发到各个机器上
|
|
最后是批量执行该shell脚本
|
|

shell模块,还支持远程执行命令并且带管道
|
|

6.ansible 实现任务计划
|
|
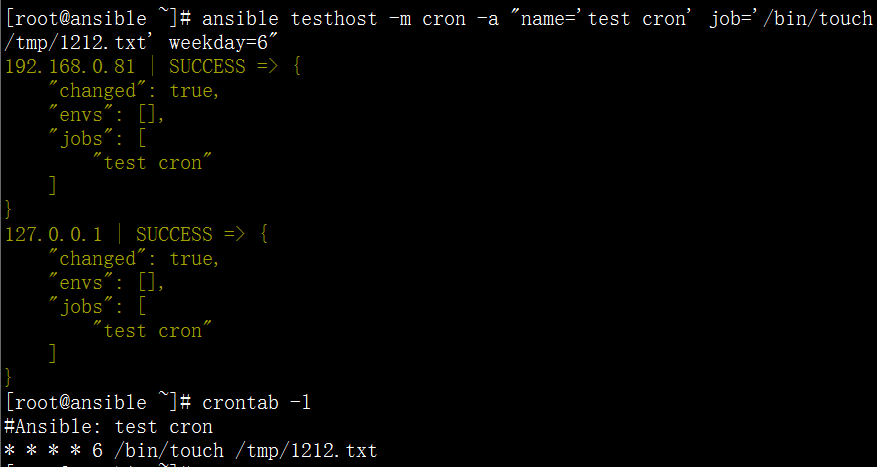
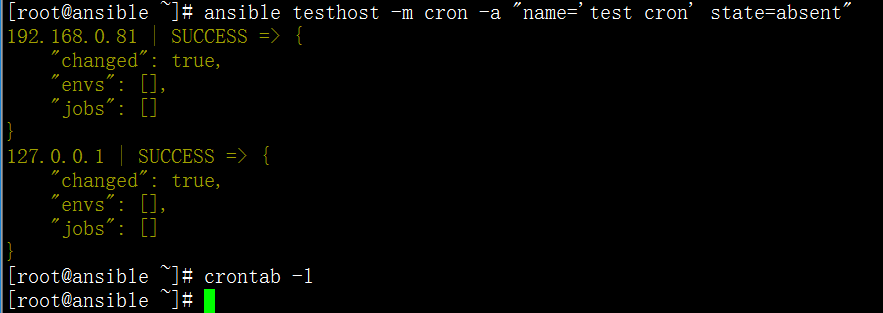
若要删除该cron 只需要加一个字段 state=absent
|
|
其他的时间表示:分钟 minute 小时 hour 日期 day 月份 month
7.Ansible安装rpm包管理服务
|
|
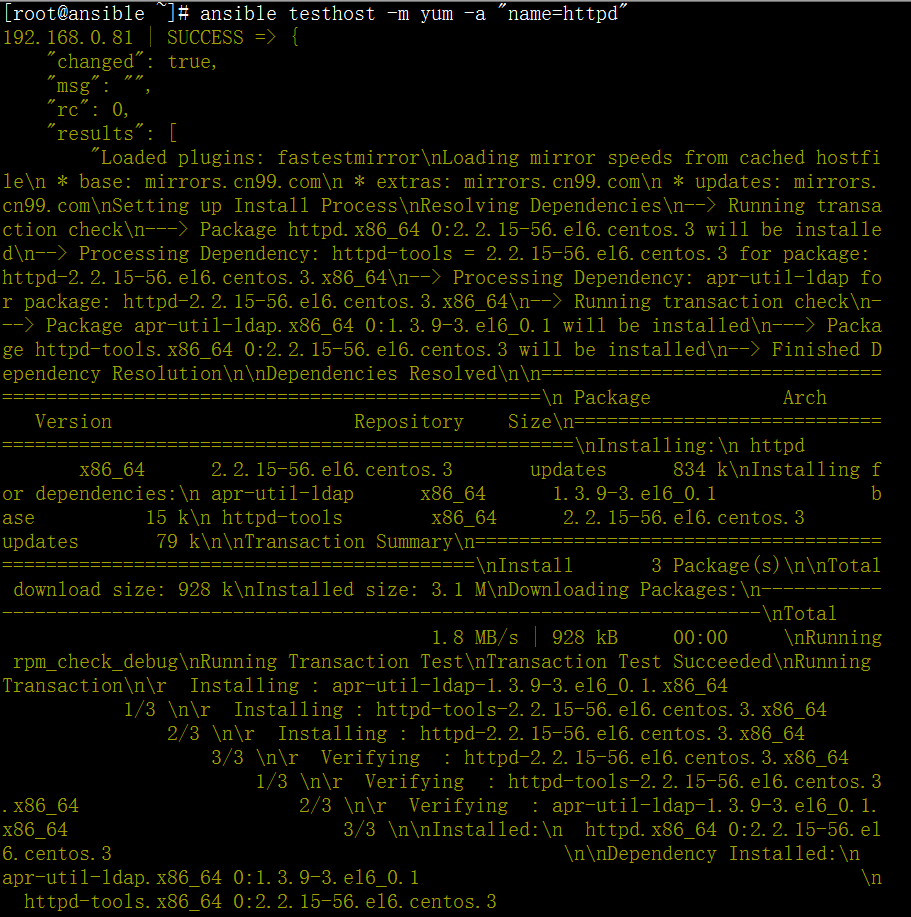
在name后面还可以加上state=installed
|
|
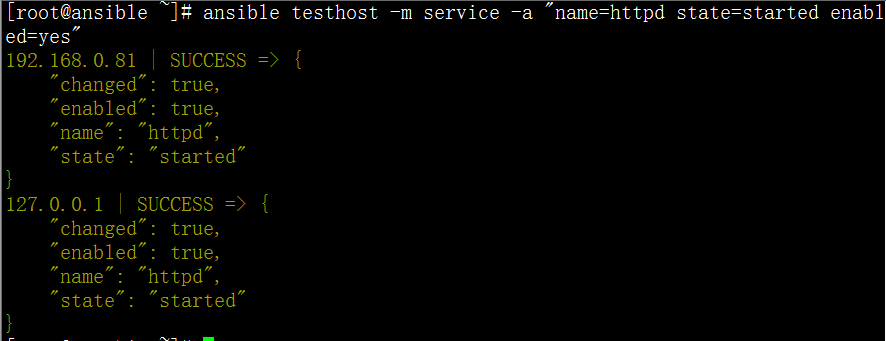

这里的name是centos系统里的服务名,可以通过chkconfig –list查到。
Ansible文档的使用
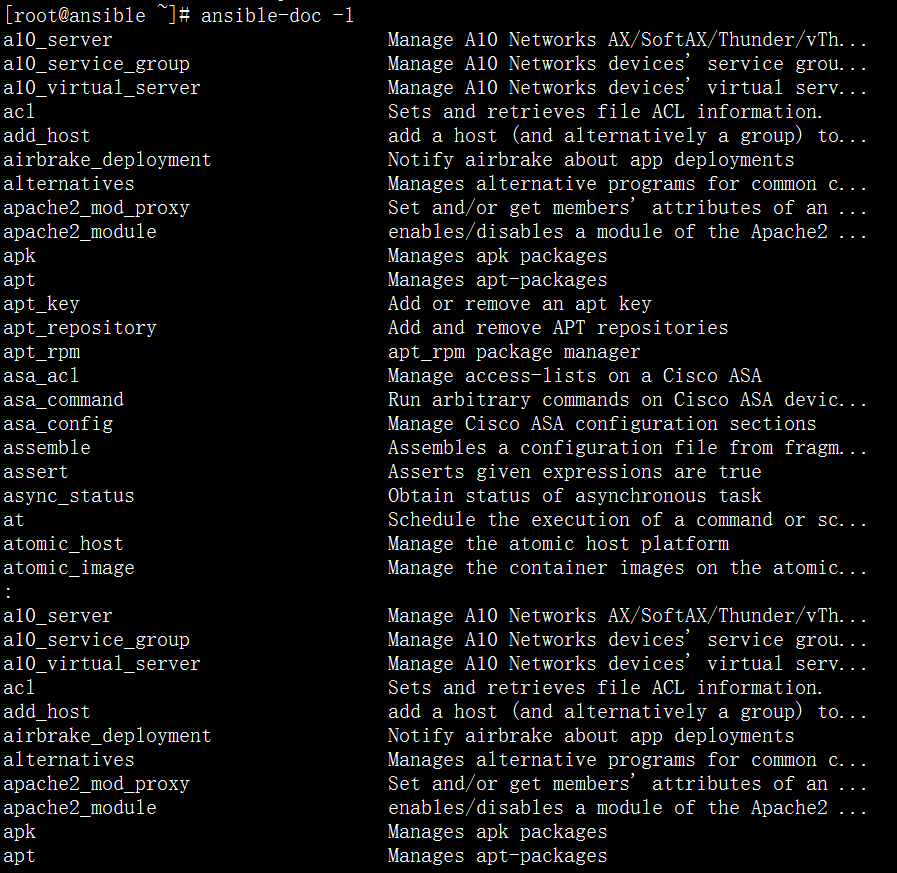
ansible-doc -l 列出所有的模块
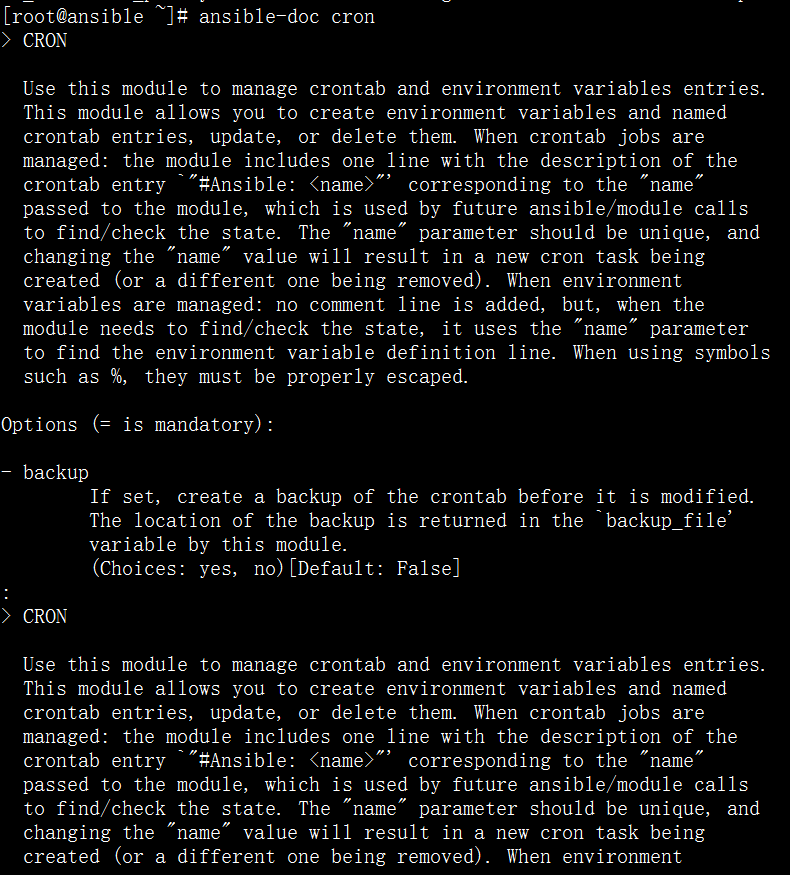
ansible-doc cron 查看指定模块的文档
8.ansible playbook 的使用
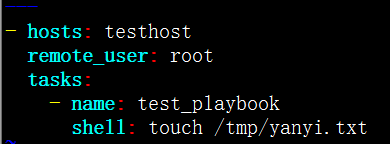
相当于把模块写入到配置文件里面,例:
|
|
添加内容
|
|
说明: hosts参数指定了对哪些主机进行参作;
user参数指定了使用什么用户登录远程主机操作;
tasks指定了一个任务,其下面的name参数同样是对任务的描述,在执行过程中会打印出来。
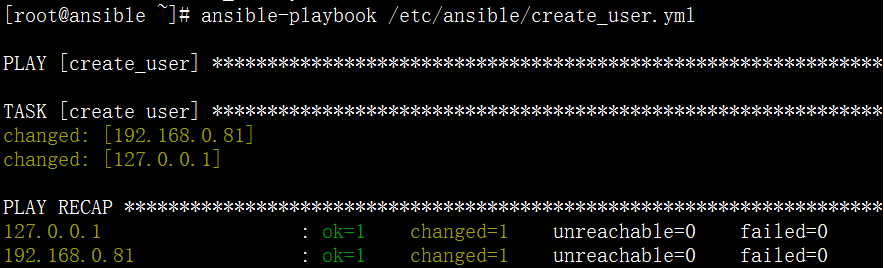
执行:
|
|
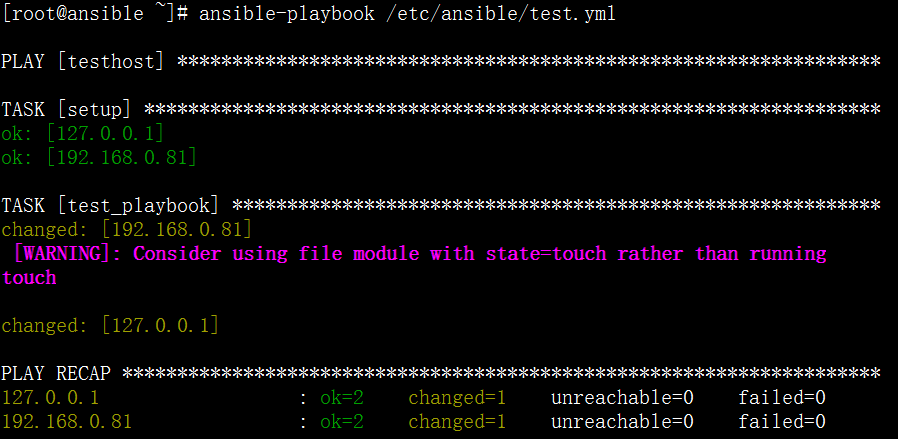
192.168.0.82
192.168.0.81

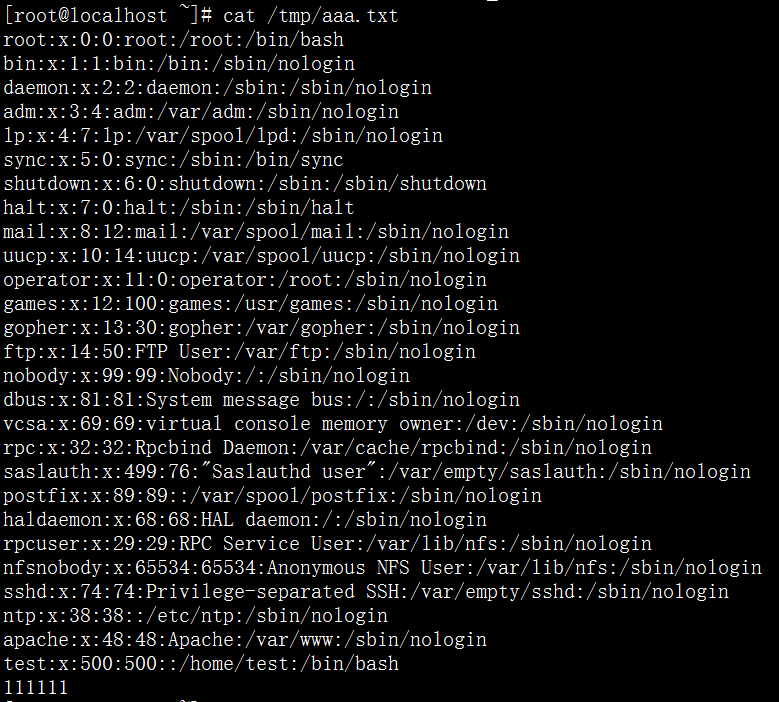
再来一个创建用户的例子:
|
|
添加内容
|
|
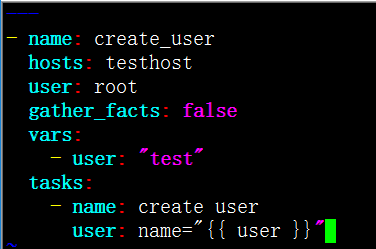
说明: name参数对该playbook实现的功能做一个概述,后面执行过程中,会打印 name变量的值 ,可以省略;gather_facts参数指定了在以下任务部分执行前,是否先执行setup模块获取主机相关信息,这在后面的task会使用到setup获取的信息时用到;vars参数,指定了变量,这里指字一个user变量,其值为test ,需要注意的是,变量值一定要用引号引住;user提定了调用user模块,name是user模块里的一个参数,而增加的用户名字调用了上面user变量的值。
|
|
192.168.0.82

192.168.0.81

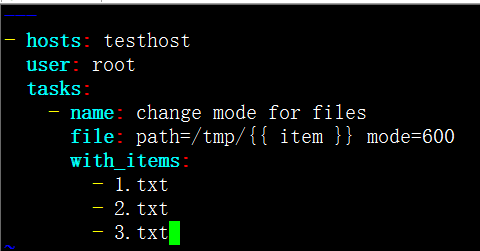
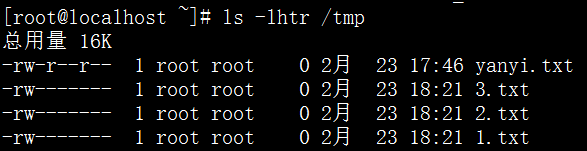
9.ansible playbook 中的循环
|
|
添加内容
|
|
|
|
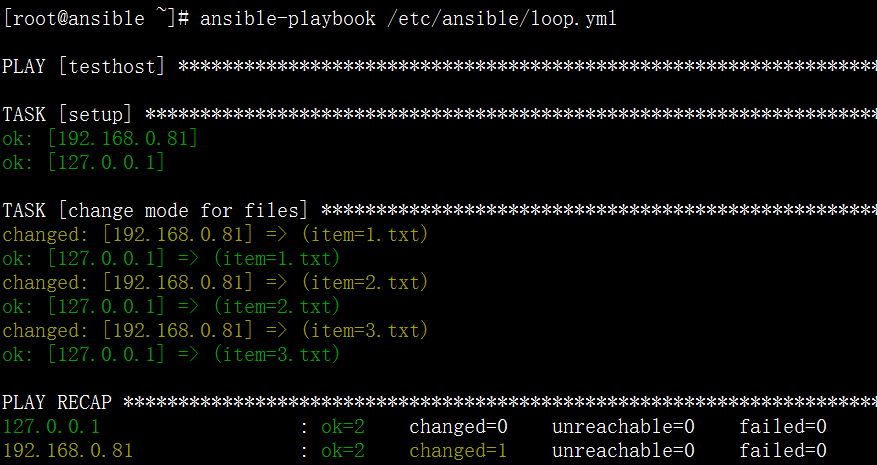
192.168.0.82 文件权限改为600
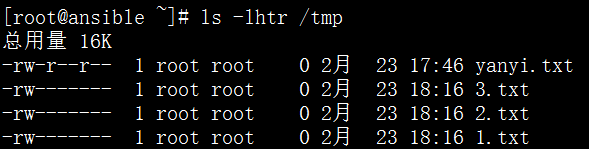
192.168.0.81 文件权限改为600
10.ansible playbook 条件判断
|
|
添加内容
|
|
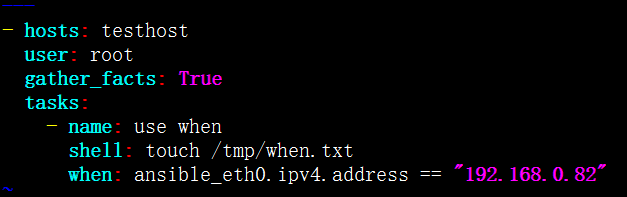
|
|
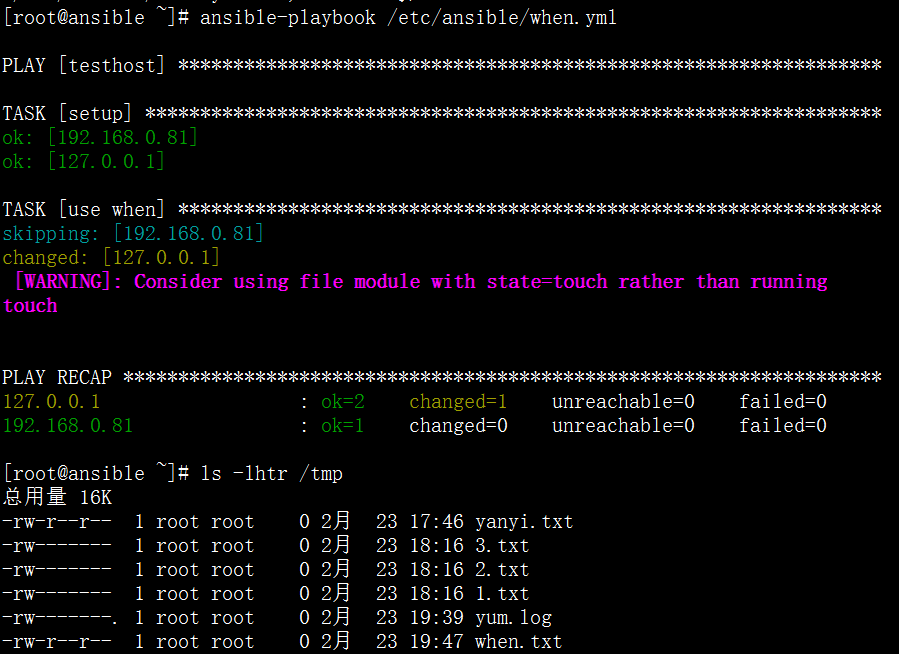
ansible判断 出现FATAL all hosts have already failed – aborting 错误
11.ansible playbook 中的 handlers
执行task之后,服务器发生变化之后要执行的一些操作,比如我们修改了配置文件后,需要重启一下服务
|
|
添加内容
|
|

说明,只有copy模块真正执行后,才会去调用下面的handlers相关的操作。也就是说如果1.txt和2.txt内容是一样的,并不会去执行handlers里面的shell相关命令。 这种比较适合配置文件发生更改后,重启服务的操作。
|
|
客户端查看
12.ansible 安装 nginx
思路:先在一台机器上编译安装好nginx、打包,然后再用ansible去下发
进入ansible配置文件目录
|
|
创建一个nginx_install的目录,方便管理
|
|
|
|
|
|
说明:roles目录下有两个角色,common为一些准备操作,install为安装nginx的操作。每个角色下面又有几个目录,handlers下面是当发生改变时要执行的操作,通常用在配置文件发生改变,重启服务。files为安装时用到的一些文件,meta为说明信息,说明角色依赖等信息,tasks里面是核心的配置文件,templates通常存一些配置文件,启动脚本等模板文件,vars下为定义的变量
需要事先准备好安装用到的文件,具体如下:
在一台机器上事先编译安装好nginx,配置好启动脚本,配置好配置文件
安装好后,我们需要把nginx目录打包
|
|
并放到/etc/ansible/nginx_install/roles/install/files/下面,名字为nginx.tar.gz
|
|
启动脚本、配置文件都要放/etc/ansible/nginx_install/roles/install/templates下面
|
|
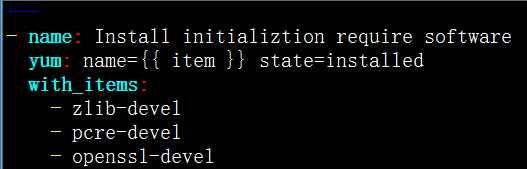
定义common的tasks,nginx是需要一些依赖包的
|
|
|
|
内容如下
|
|
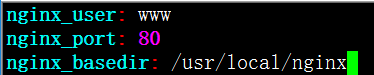
定义变量
|
|
内容如下
|
|
首先要把所有用到的文档拷贝到目标机器
|
|
内容如下
|
|

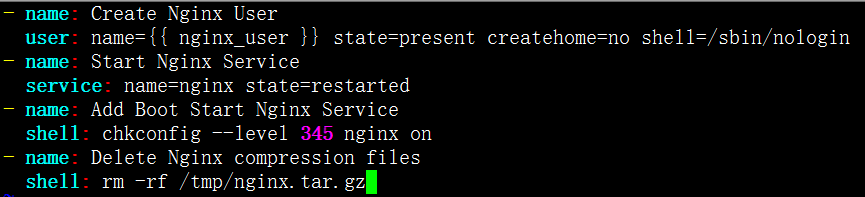
接下来会建立用户,启动服务,删除压缩包
|
|
内容如下
|
|
再创建main.yml并且把copy和install调用
|
|
内容如下
|
|

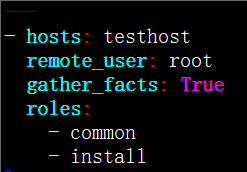
到此两个roles:common和install就定义完成了,接下来要定义一个入口配置文件
|
|
内容如下
|
|
执行: ansible-playbook /etc/ansible/nginx_install/install.yml
|
|
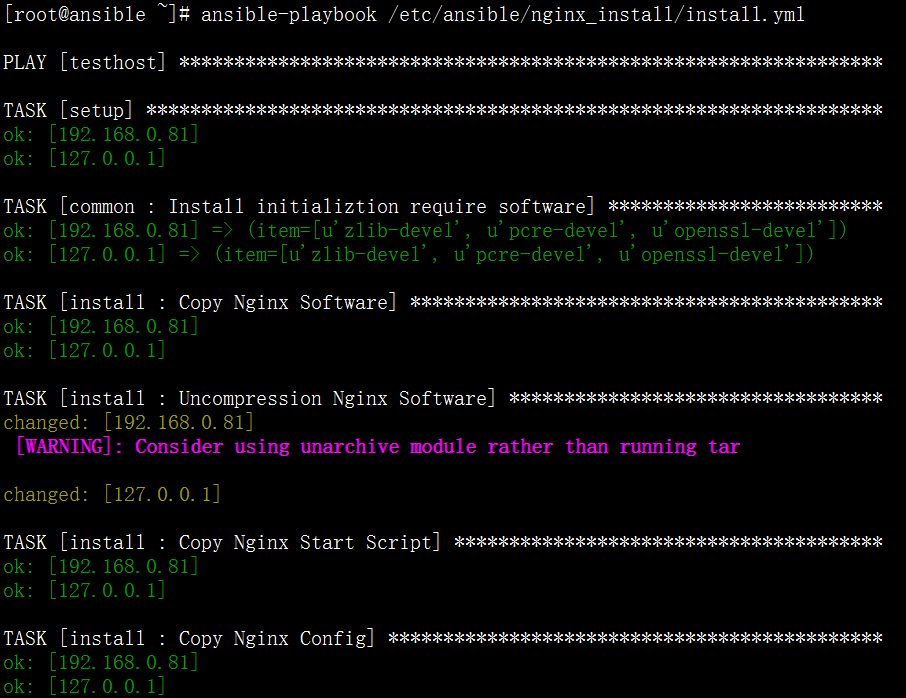
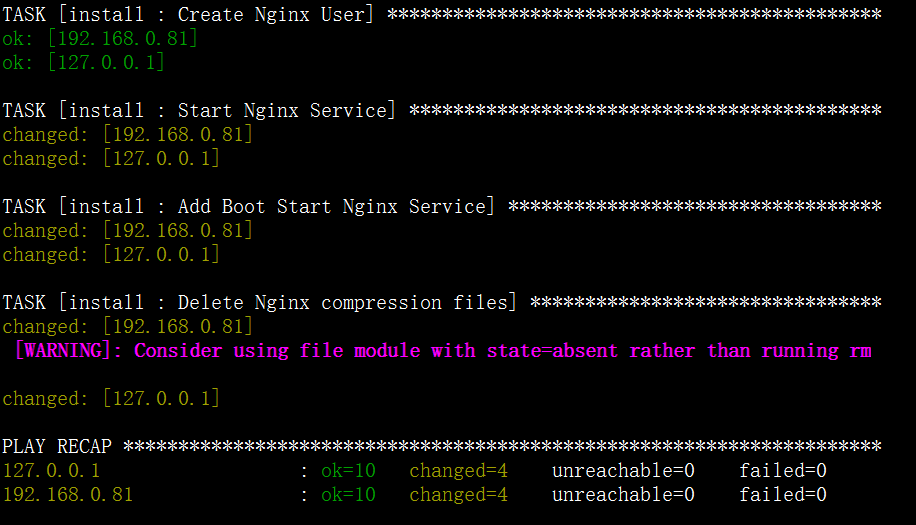
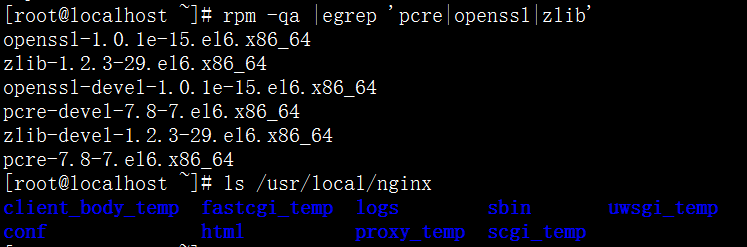
注意:执行之前一定要检查所有机器 80 端口是否占用,否则会出错!
客户端查看

下载整个样例库
git clone git://github.com/dl528888/ansible-examples.git
|
|
git命令,需要yum先安装一下:
|
|
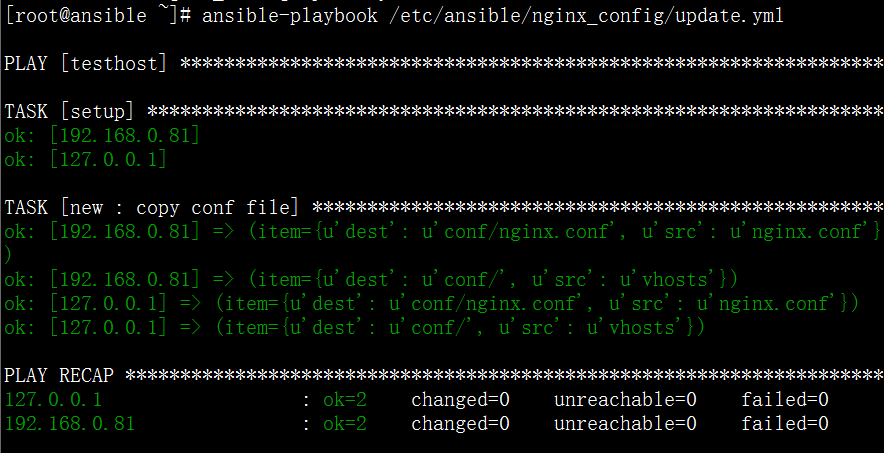
13.ansible 管理配置文件
生产环境中大多时候是需要管理配置文件的,安装软件包只是在初始化环境的时候用一下。下面我们来写个管理nginx配置文件的playbook
|
|
其中new为更新时用到的,old为回滚时用到的,files下面为nginx.conf和vhosts目录,handlers为重启nginx服务的命令
关于回滚,需要在执行playbook之前先备份一下旧的配置,所以对于老配置文件的管理一定要严格,千万不能随便去修改线上机器的配置,并且要保证new/files下面的配置和线上的配置一致
先把nginx.conf和vhosts目录放到files目录下面
|
|
|
|
|
|
定义变量
|
|

|
|
定义重新加载nginx服务
|
|

|
|
这是核心的任务
|
|

|
|
最后是定义总入口配置
|
|
执行:
|
|
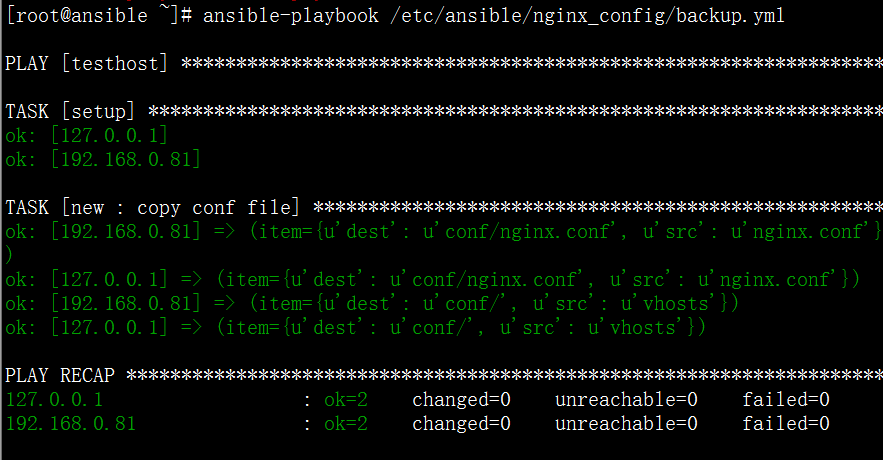
而回滚的backup.yml对应的roles为old
|
|
|
|
回滚操作就是把旧的配置覆盖,然后重新加载nginx服务